IPoverDNS: Difference between revisions
| (25 intermediate revisions by 2 users not shown) | |||
| Line 1: | Line 1: | ||
== |
== Introduction == |
||
Firewalls for public wifi such as universities, airports, train stations, coffee shops or hotels often have restricting rules that prevent IP traffic before the user has logged in to the network, requiring a password, some payment or both before allowing access to the internet. But in many cases, DNS traffic to the local nameserver is not blocked. By setting up an authoritative nameserver for one's own subdomain, one can send DNS queries that will be transmitted to this outside DNS server, and therefore transmit data. It is possible to tunnel IP traffic encoded in DNS messages and therefore circumvent the restrictions of the network. |
|||
(todo) |
|||
== |
== How it works == |
||
A large part of the Wlan solutions in use is initially an open, unencrypted WLAN, which in most cases is named after the provider or the location or the hotel name. If the attacker, which at this point still acts as a normal customer, now works its network card to this WLAN and sends a DHCP request, it receives from the access point a local LAN-IP address. |
|||
(todo) |
|||
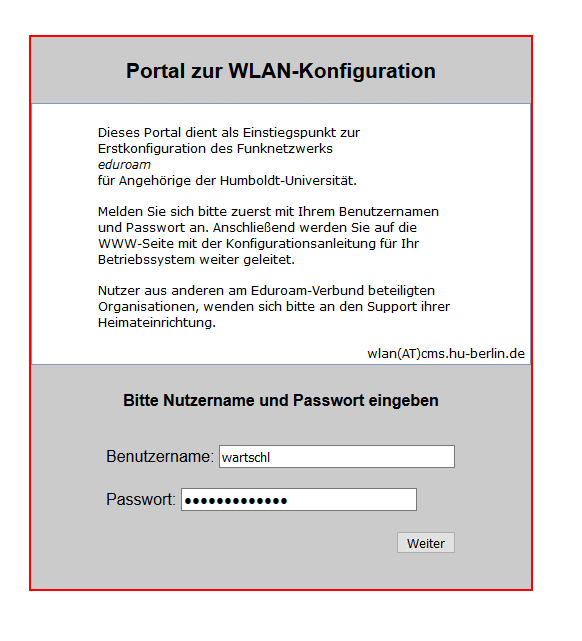
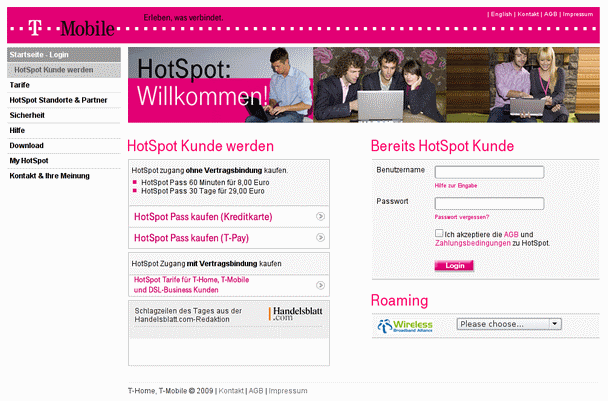
However, it can not receive and send packets, since a firewall on the access point drops all outward packets. (In detail, this means that the access point does not reject the connection by sending RST packets, but completely ignores the connection. For Iptables, this is equivalent to the "DROP" statement.) There is an exception to this categorical rejection these are connections on port 80 (HTTP). All HTTP requests are intercepted by the access point via a transparent HTTP proxy and the requests are transferred to a web page of the Wlan provider. The normal customer notices this by entering the browser, entering an arbitrary domain, and instead of the expected website, the web page of the provider appears, usually with a login option and instructions for payment. |
|||
[[file:Eudoramsetup.png|350px]] |
|||
[[file:Telekomhotspot.png|450]] |
|||
But the client can still communicate with the local DNS server. DNS, the service that resolves domain names into IP addresses, is integrated into the access point for most of the wisans. And for all tested wlans, it also resolves names for non-authentic clients, so you can already send DNS queries before paying or logging in. And since the DNS server needs to communicate with other DNS servers out there, a communication channel is created that can be used for tunneling. |
|||
== Anleitung == |
|||
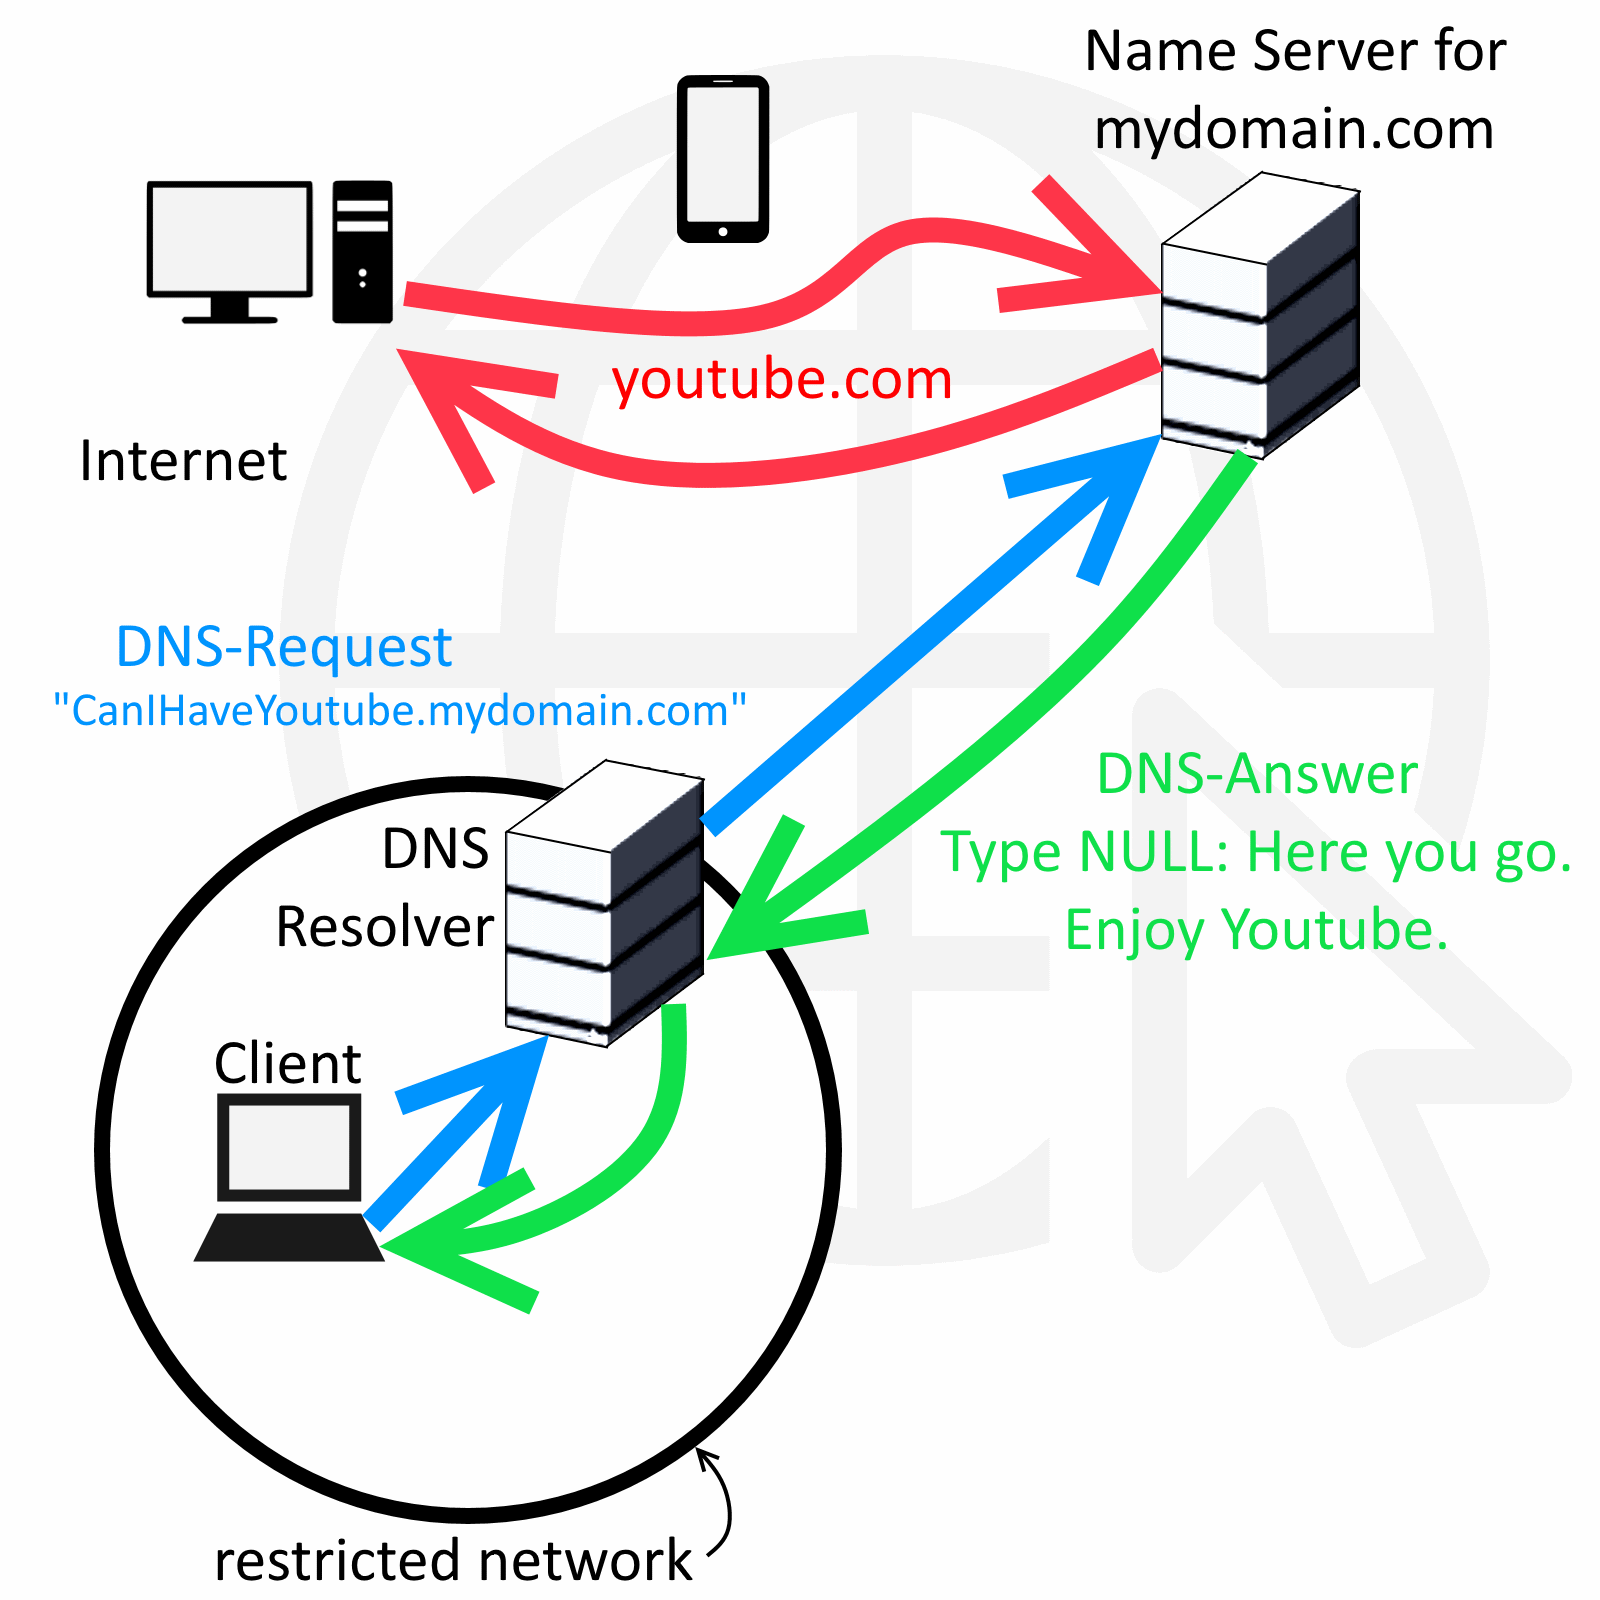
The attacker just needs to set up their own domain (say, "mydomain.com") with their own authoritative nameserver that resolves queries for "anysubdomain.mydomain.com". Now, when the DNS resolver of the restricted network gets a request for those subdomains, it sends the request to the authoritative nameserver. Encoded in this request, more specifically, in the subdomain, is the IP packet that goes out. The autoritative nameserver can access the internet himself, acting as a proxy, get the answer and encode it in a DNS NULL or TXT or any other large DNS record type, and send it back to the DNS resolver which will hand the answer to the client. Now the client has sucessfully communicated with the outside world. To conclude, a user needs both a server and a client that communicate through DNS messages under his control, the client being e.g. his laptop in the coffee shop and the server being online somewhere with regular internet access. |
|||
=== DNS Server Setup === |
|||
This principle is implemented in software such as iodine (http://code.kryo.se/iodine/), which runs on Linux, Mac OS X, FreeBSD, NetBSD, OpenBSD and Windows. You need nothing more than iodine and your own webserver to start tunneling IP over DNS. |
|||
(todo: much more explanation) |
|||
[[file:IPoverDNSPrinciple.png|500px]] |
|||
Setting up Iodine requires control over a domain, for which you have to register the following dns records. |
|||
== Anleitung == |
|||
=== DNS Server Setup === |
|||
Setting up Iodine requires control over a real domain, and a server that is online and can act as iodine server. It has to run with a public IP that will function as nameserver for your domain managed by iodine. |
|||
For your domain, e.g. "mydomain.com", you need to be able to register NS and A records. Several free domain providers offer this service. |
|||
Assume you have a domain called “mydomain.com” and it’s IP is “1.2.3.4”. |
Assume you have a domain called “mydomain.com” and it’s IP is “1.2.3.4”. |
||
You have to register a subdomain, e.g. “tunnel.mydomain.com”. Also, you need another subdomain “ns.mydomain.com” for your nameserver. |
You have to register a subdomain, e.g. “tunnel.mydomain.com”. Also, you need another subdomain “ns.mydomain.com” for your nameserver. For the tunnel subdomain, Iodine on your own server (1.2.3.4) will pretend to be the authoritative nameserver. |
||
For the tunnel subdomain, Iodine on your own server (1.2.3.4) will pretend to be the authoritative nameserver. |
|||
So you need to create an A record for the sub-domain (tunnel.mydomain.com) that point to IP of the private server. |
So you need to create an A record for the sub-domain (tunnel.mydomain.com) that point to IP of the private server. |
||
| Line 29: | Line 38: | ||
And you need a NS recod that makes the dns sub-domain the authoritative name server for the tunnel sub domain. |
And you need a NS recod that makes the dns sub-domain the authoritative name server for the tunnel sub domain. |
||
<code>tunnel IN NS dns. |
<code>tunnel IN NS dns.mydomain.com. </code> |
||
The result could look like this: |
|||
[[File:https://sarwiki.informatik.hu-berlin.de/images/1/17/Dns.png]] |
|||
[[File:Dns.png]] |
|||
<code> |
|||
A ns points to 1.2.3.4 |
|||
NS tunnel managed by ns.mydomain.com |
|||
</code> |
|||
=== Iodine Server Setup === |
=== Iodine Server Setup === |
||
====install and start iodine==== |
====install and start iodine==== |
||
To run iodine on your server, simply install the programm and run the server variation (mind the name: iodine'''d''') |
|||
<code>$ sudo apt install iodine</code> |
<code>$ sudo apt install iodine</code> |
||
<code>$ sudo iodined |
<code>$ sudo iodined -f 10.0.0.1 -P 123456 tunnel.mydomain.com </code> |
||
-f: run in foreground |
|||
10.0.0.1: the server IP in the virtuel connection / tunnel |
|||
-P: use a password ("123456" is here the example) |
|||
tunnel.mydomain.com: your tunnel subdomain |
|||
==== Test server ==== |
==== Test server ==== |
||
http://code.kryo.se/iodine/check-it/ |
You can test your server setup by putting in the IP here: http://code.kryo.se/iodine/check-it/ |
||
==== Configuring NAT and IP masquerading ==== |
|||
To forward your traffic to the internet and make your server do NAT, you have to set this up. |
|||
Enable packet forwarding: |
|||
<code>echo 1 > /proc/sys/net/ipv4/ip_forward</code> |
|||
Make the setting persistent: |
|||
<code>echo "net.ipv4.ip_forward=1" > /etc/sysctl.d/60-ipv4-forward.conf</code> |
|||
Enable NAT by adding this to your IPTABLES: |
|||
<code> |
|||
iptables -t nat -A POSTROUTING -o eth0 -j MASQUERADE |
|||
iptables -t filter -A FORWARD -i eth0 -o dns0 -m state --state RELATED,ESTABLISHED -j ACCEPT |
|||
iptables -t filter -A FORWARD -i dns0 -o eth0 -j ACCEPT |
|||
</code> |
|||
Make it persistent, e.g. like this: |
|||
<code>iptables-save > /etc/iptables.rules</code> |
|||
| Line 54: | Line 98: | ||
====install and start iodine==== |
====install and start iodine==== |
||
It's important that client and server use the same iodine version. You install iodine on your client computer just as easily as on the server and start it with similar parameters. At the end, it should print "Connection setup complete, transmitting data." |
|||
<code>$ sudo apt install iodine</code> |
<code>$ sudo apt install iodine</code> |
||
<code>$ sudo iodine -f -P 123456 tunnel. |
<code>$ sudo iodine -f -P 123456 tunnel.mydomain.com</code> |
||
====Test tunnel==== |
====Test tunnel==== |
||
Now it's time to test the tunnel. Run this on your client to see if you can reach the server through the tunnel. |
|||
<code>$ ping 10.0.0.1</code> |
<code>$ ping 10.0.0.1</code> |
||
====Set up routes to go through the tunnel==== |
====Set up routes to go through the tunnel==== |
||
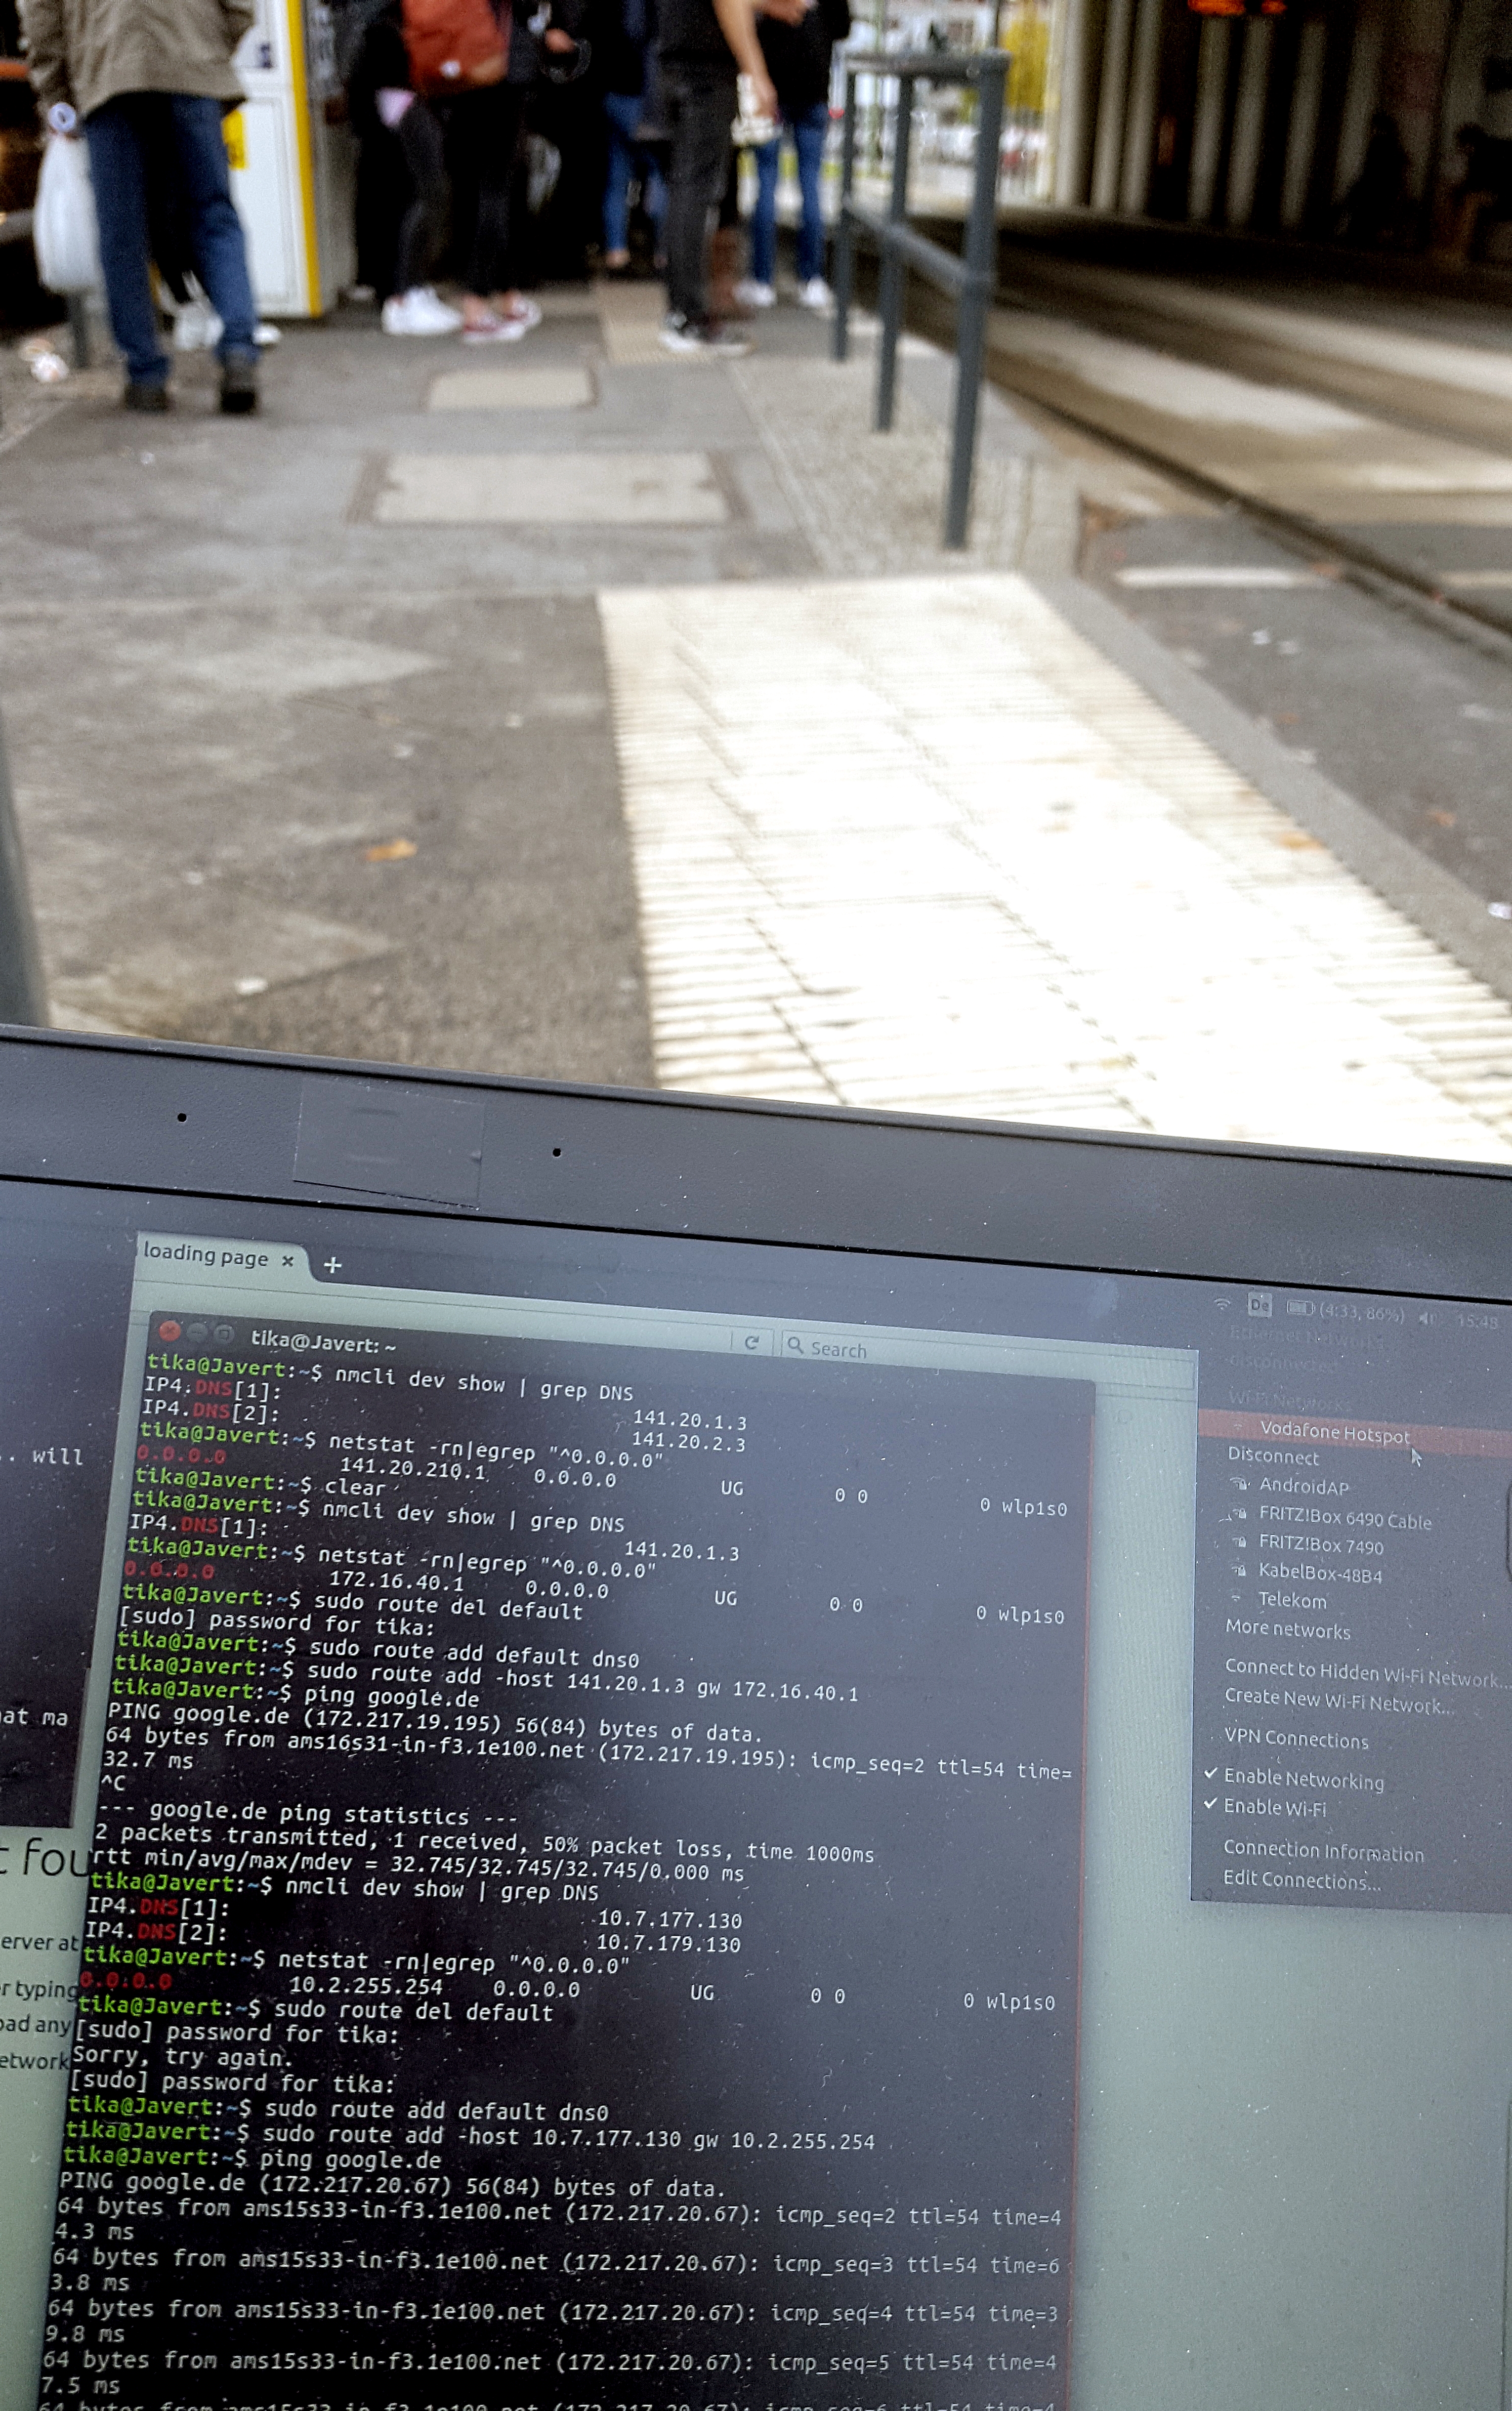
Finally, the routes have to be set so that per default packets send through the dns tunnel, as they are "inner" packets in our tunneling. Only data going directly to the DNS resolver of the local, restricted network has to go directly there and not again in the tunnel, because those are the "outer" packets that have to be transmitted to the DNS resolver to transmitted to the outside world. To set up this, we delete the default route, add a new default route and add a route to the DNS resolver. We need to find out our standard gateway and our DNS resolver. |
|||
Find out dns server: |
Find out dns server: |
||
<code>$ |
<code>$ nmcli dev show | grep DNS</code> |
||
(This is our DNS server IP). |
|||
Find out gateway: |
Find out gateway: |
||
<code>$ |
<code>$ netstat -rn|egrep "^0.0.0.0"</code> |
||
(in the most left column, you see the destination, in the column right to that, you see the gateway. Pick the one that isn't 0.0.0.0. This is our gateway IP.) |
|||
Find out your tunnel interface: |
Find out your tunnel interface: |
||
ifconfig -> look for something like dns0 that wasn’t there before |
ifconfig -> look for something like dns0 that wasn’t there before |
||
Now modify the routes: |
|||
<code>$ route del default</code> |
<code>$ route del default</code> |
||
<code>$ route add default dns0</code> |
<code>$ route add default dns0</code> |
||
And if dns server and gateway don’t have the the same IP adress anyway: |
|||
<code>route add -host [DNS server IP] gw [gateway IP]</code> |
<code>route add -host [DNS server IP] gw [gateway IP]</code> |
||
[[File:SetupIPoDNS.png|1000px]] |
|||
==== Put a ssh tunnel through the dns tunnel for encryption ==== |
==== Put a ssh tunnel through the dns tunnel for encryption ==== |
||
Iodine doesn't encrypt its data per default. To do that, you need to put a ssh tunnel through the dns tunnel. |
|||
<code>$ ssh -D 5000 -N root@10.0.0.1</code> |
<code>$ ssh -D 5000 -N root@10.0.0.1</code> |
||
| Line 94: | Line 153: | ||
=== Deactivating Iodine === |
=== Deactivating Iodine === |
||
Stop iodine client on client and server |
|||
(just by pressing ctrl+c) |
(just by pressing ctrl+c) |
||
Set routes back to ‘normal’ |
Set routes back to ‘normal’ |
||
<code>$ |
<code>$ route del default</code> |
||
<code>$ |
<code>$ route add default [gateway ip]</code> |
||
or just restart your networking manually by using the network manager or restart the device entirely. |
...or just restart your networking manually by using the network manager or restart the device entirely. |
||
== Trying it out == |
|||
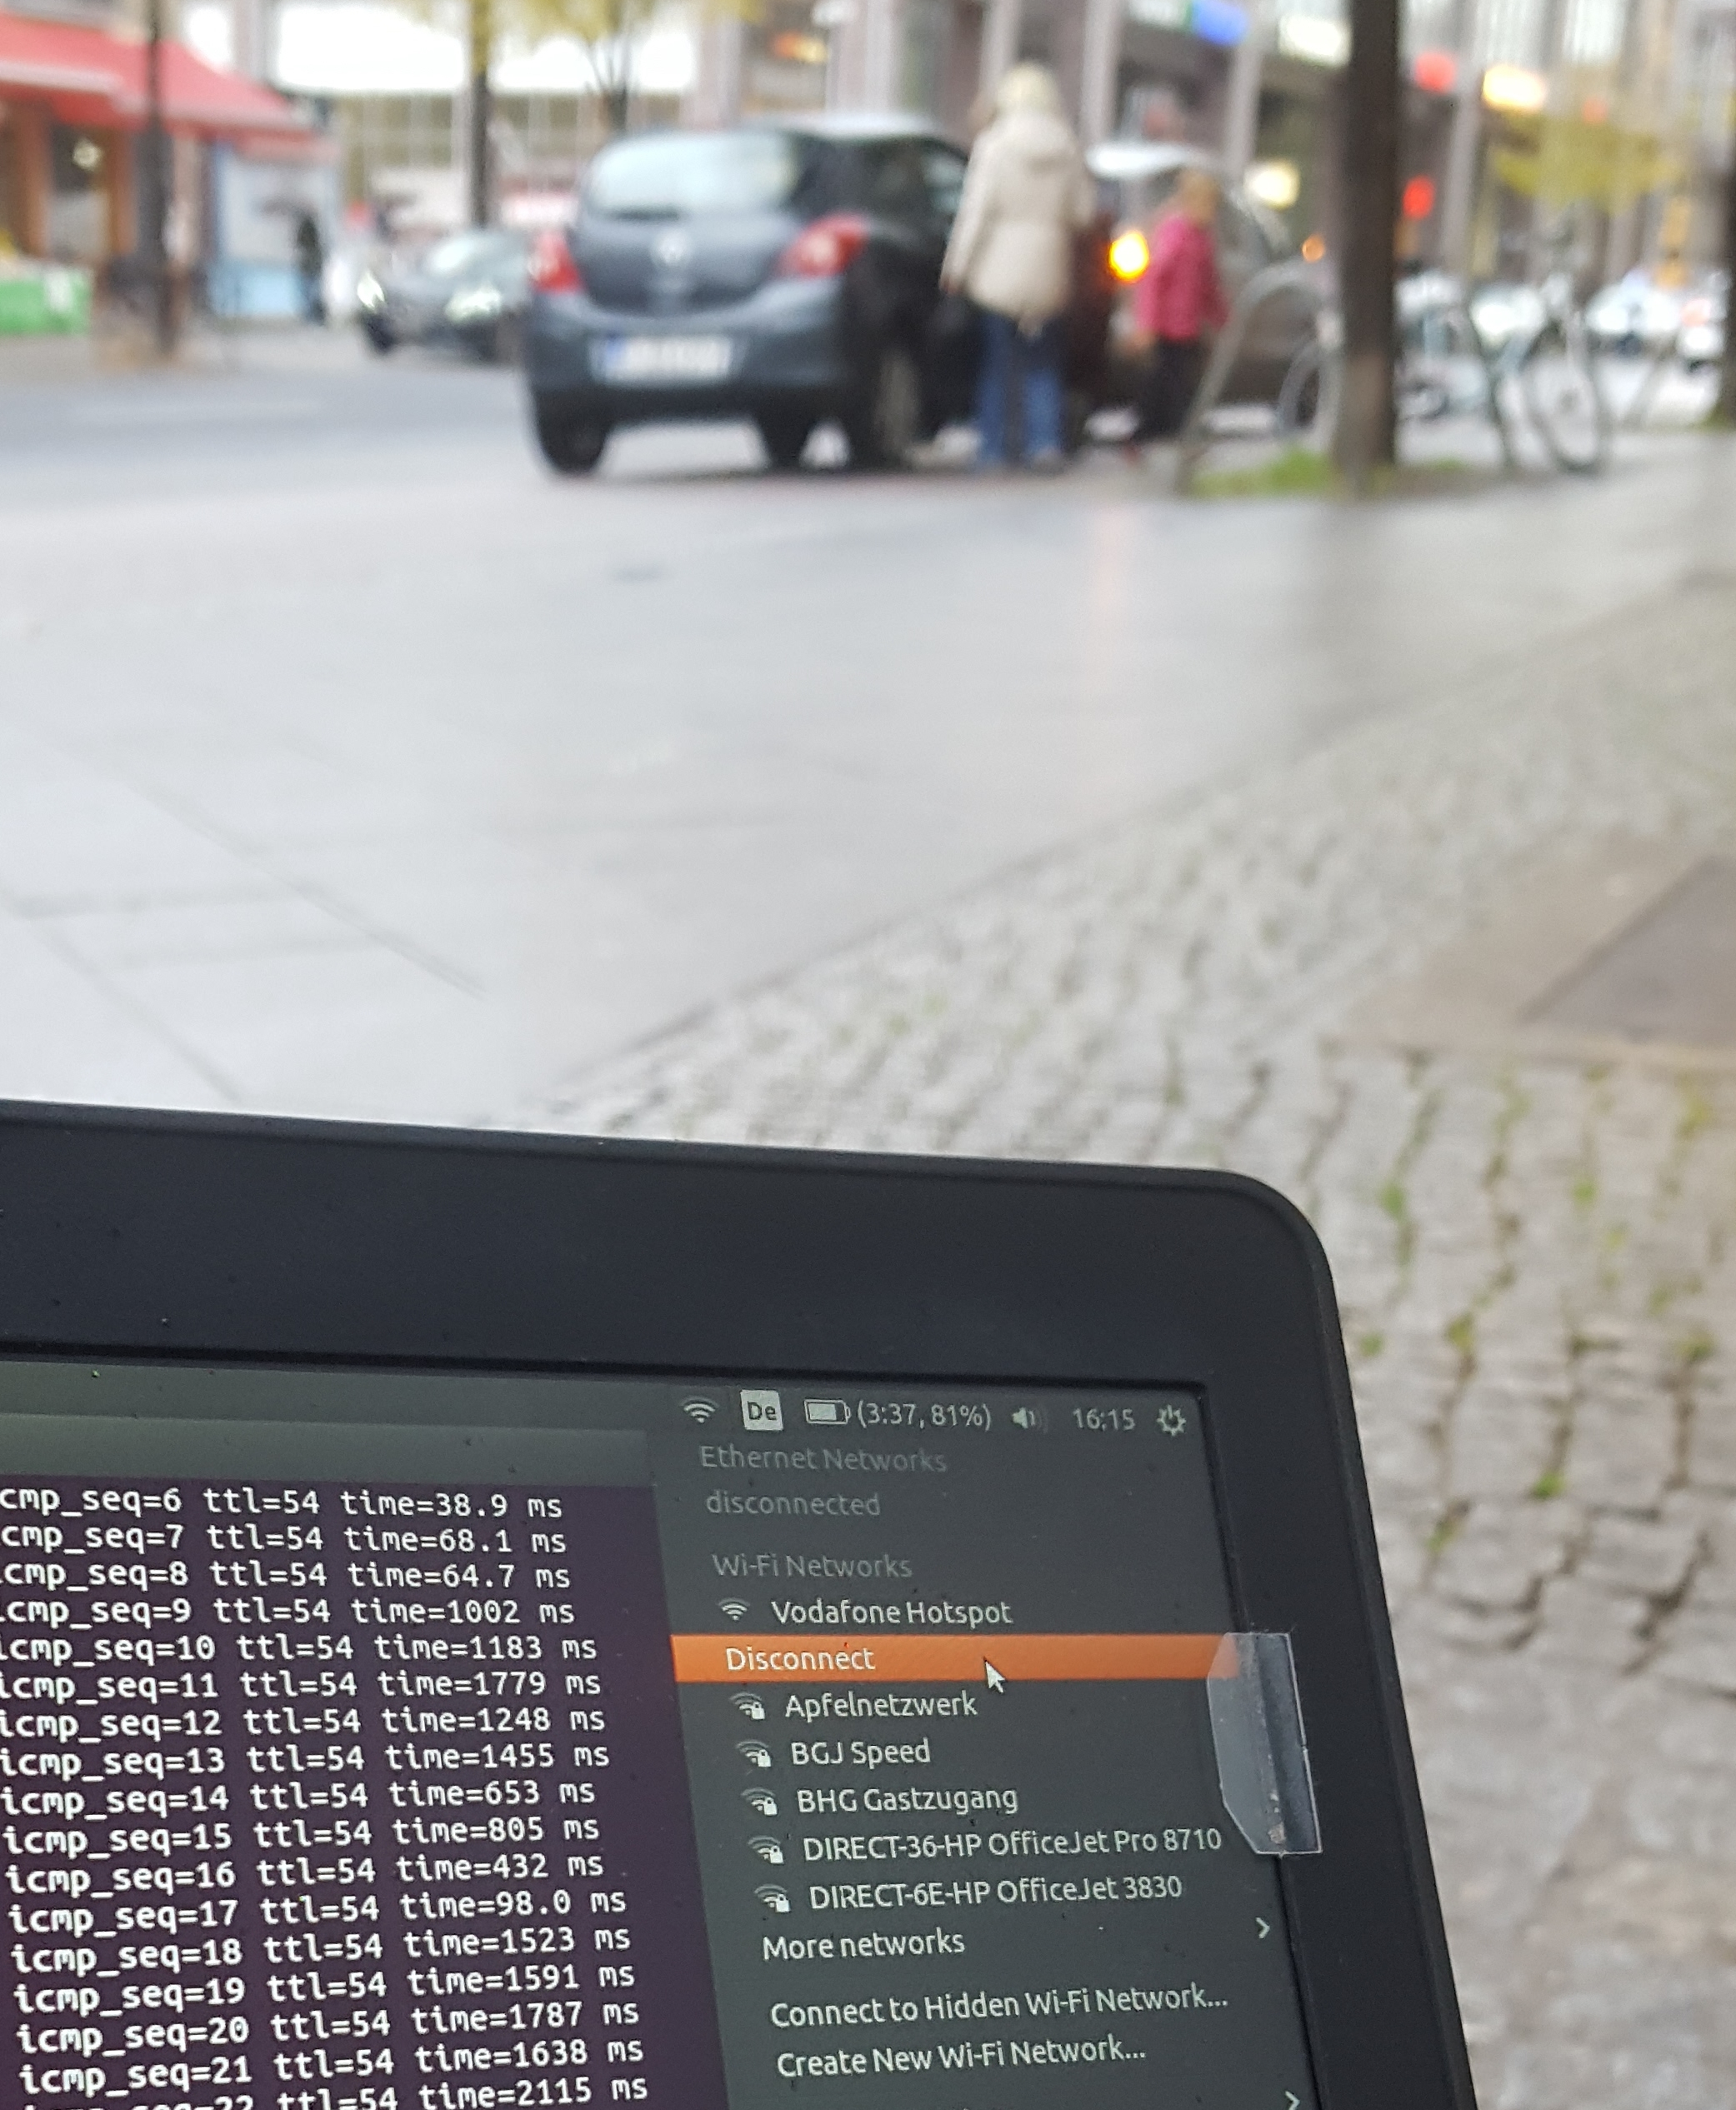
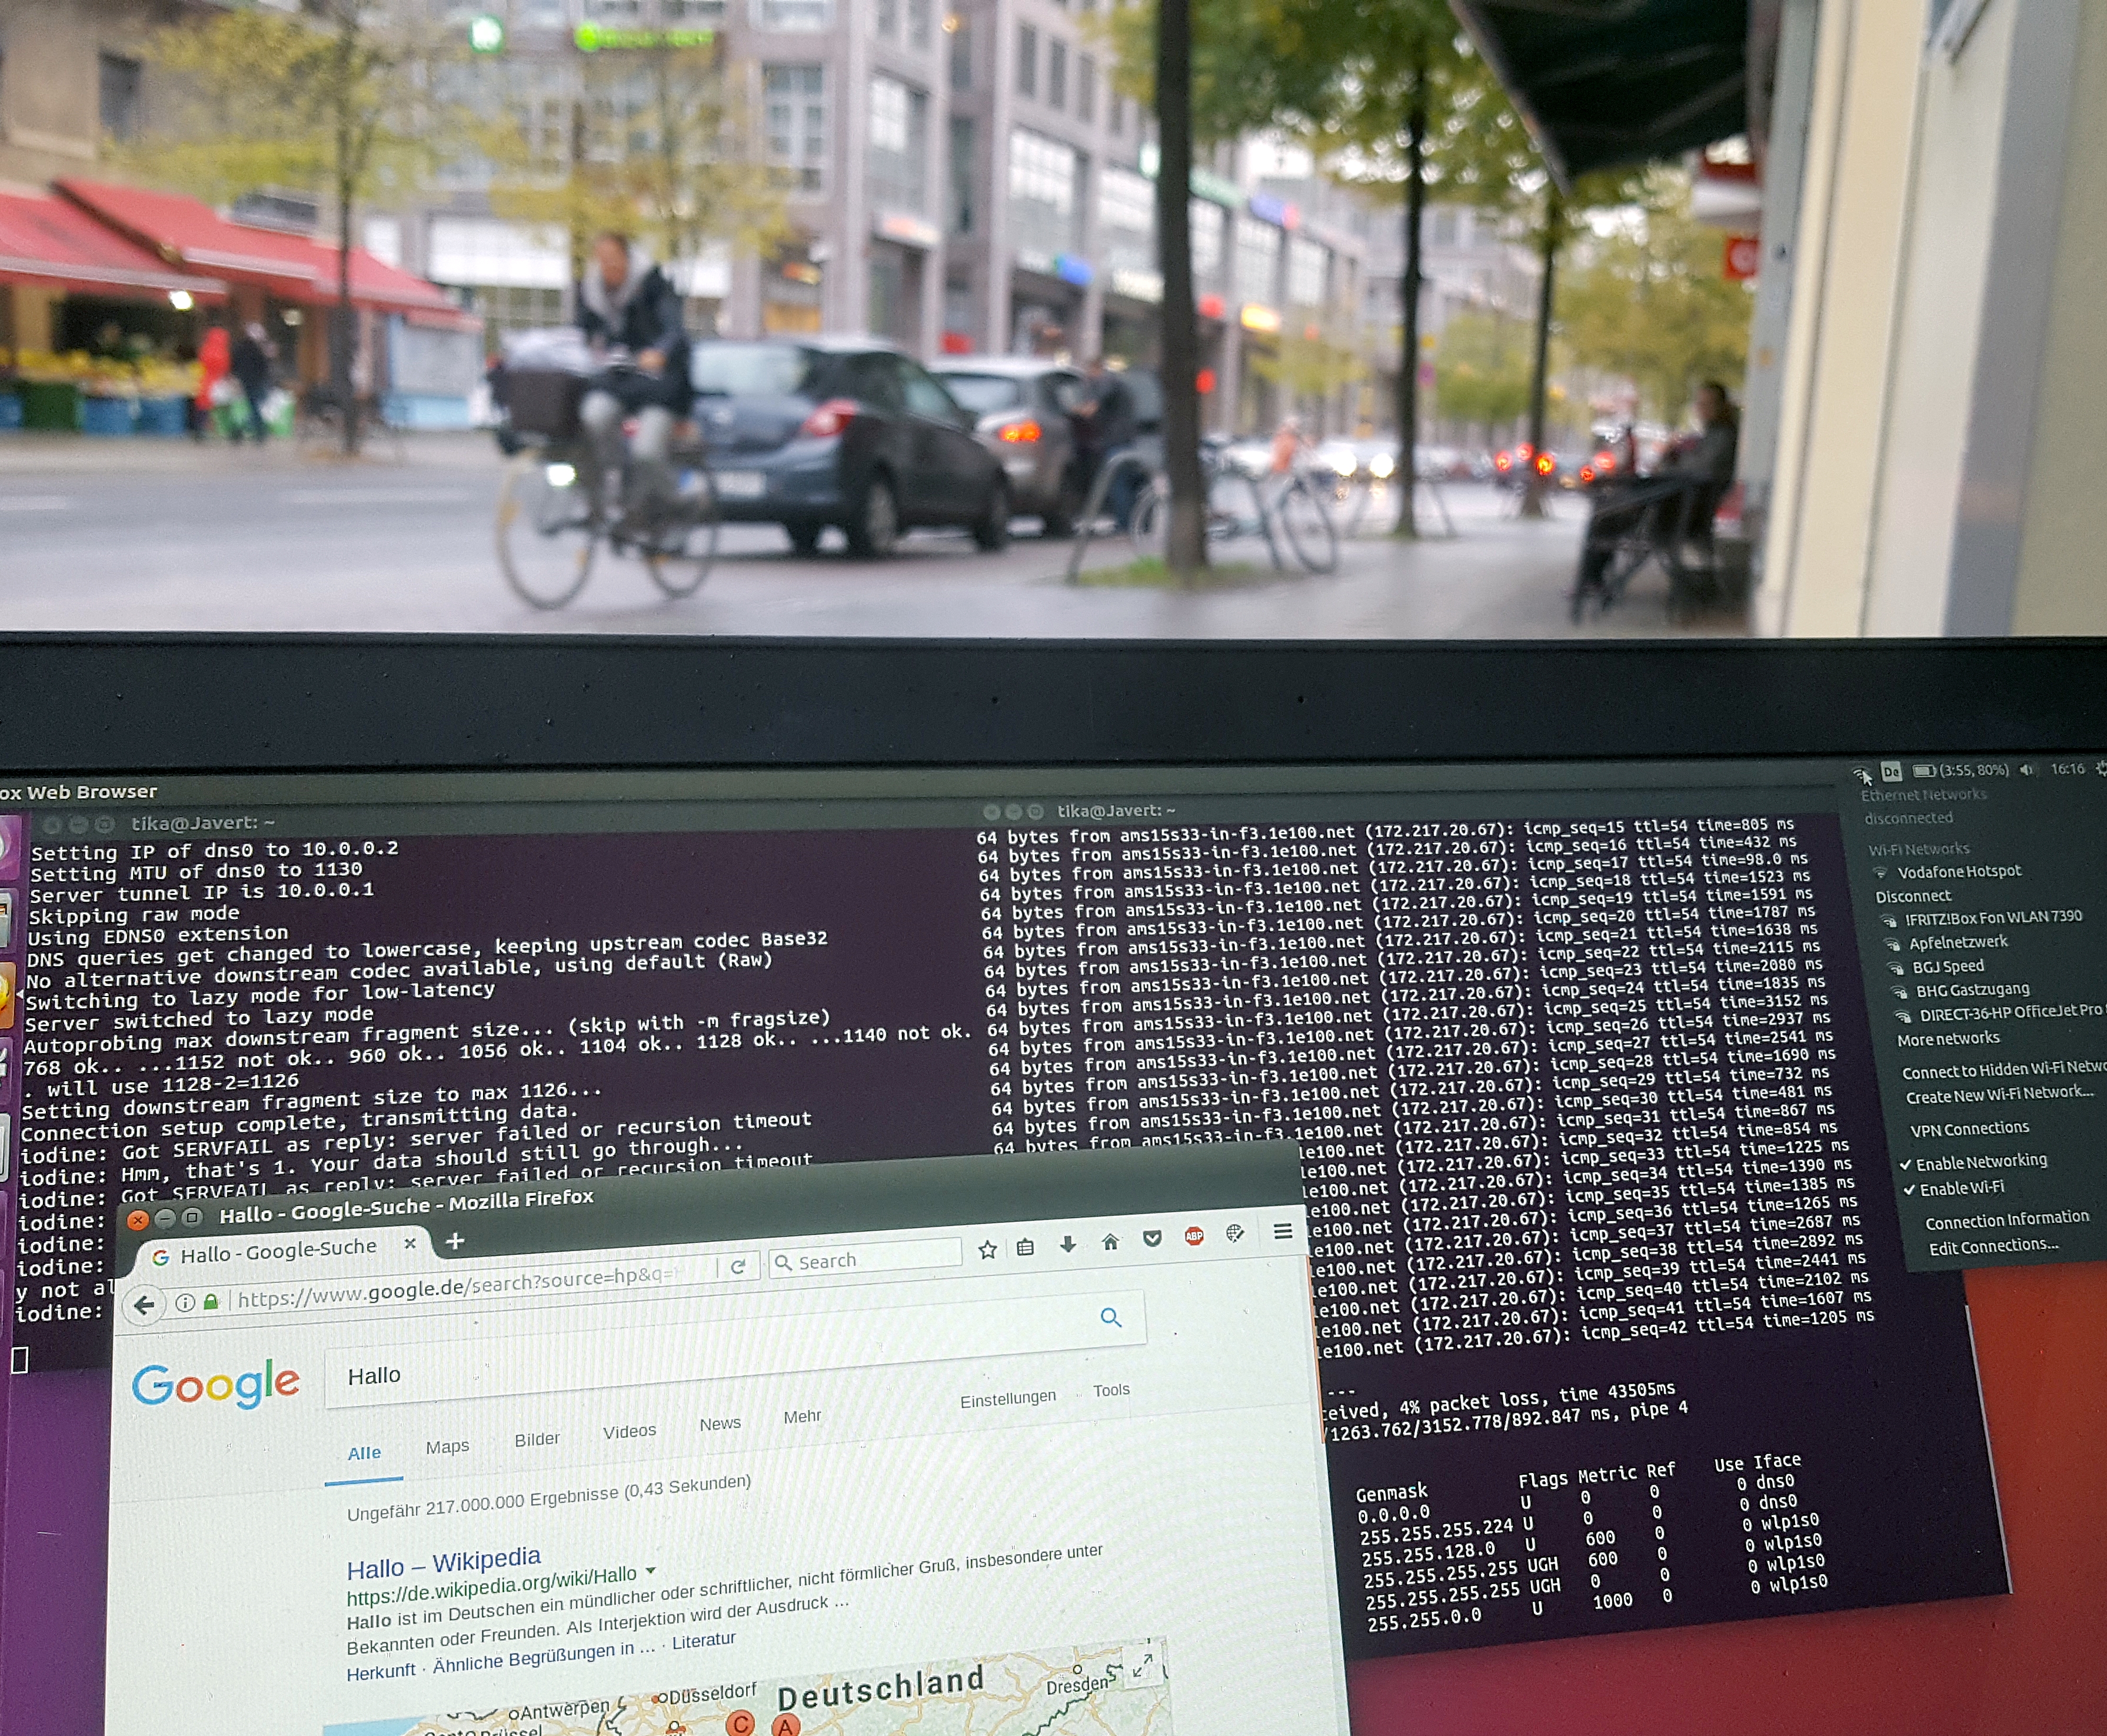
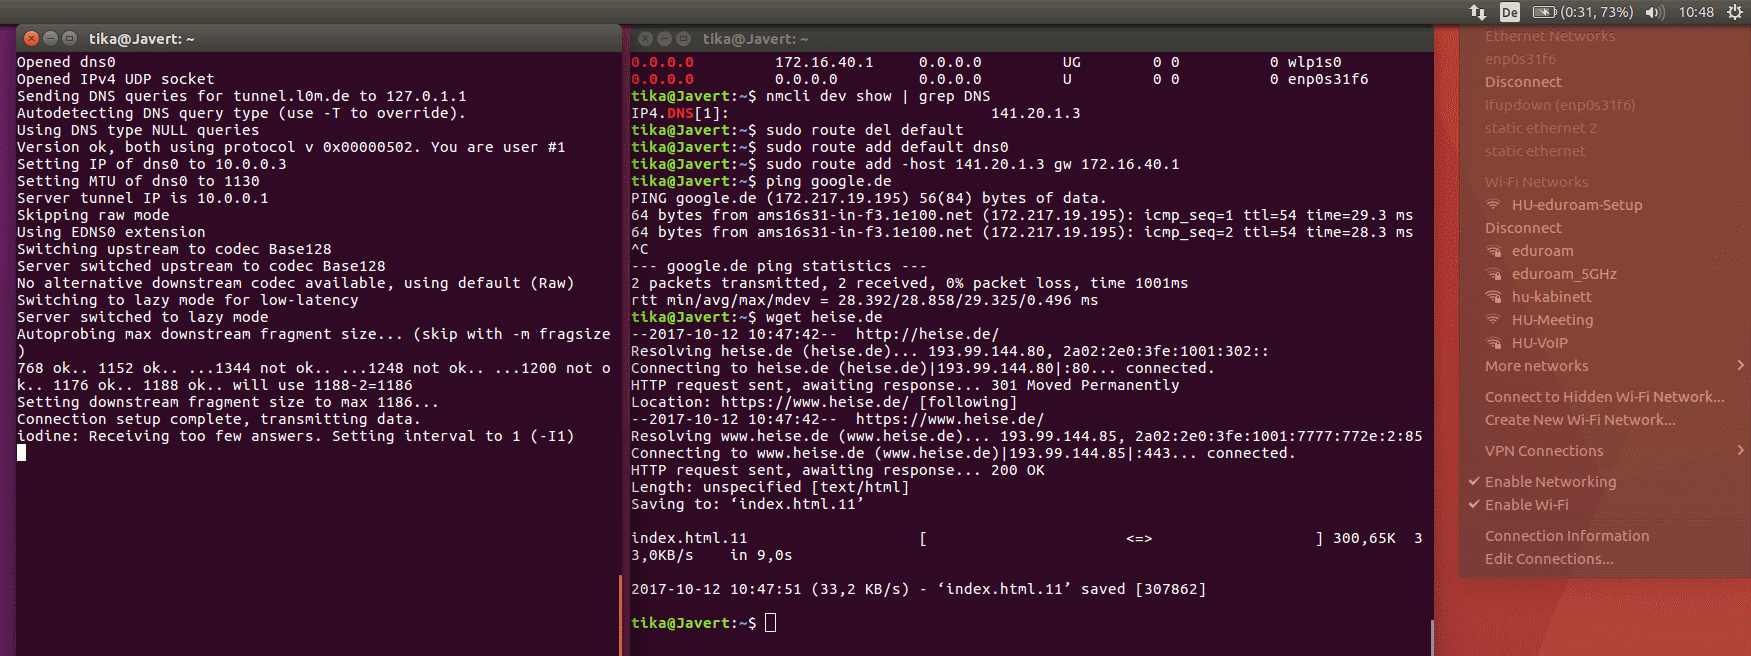
We tried out the principle and it worked fine. We actually did manage to circumvent the login portals of eduroam and two different Vodafone hotspots (located at S Adlershof and S Köpenick) as well as one Vodafone homespot. Here is some proof: |
|||
[[File:Adlershof.jpg|500px]][[File:Connected.jpg|650px]][[File:Koepenick.jpg|600px]] |
|||
[[File:Eudoroam.png|600px]] |
|||
== Speed == |
|||
Of course, tunneling IP over DNS does not allow for a very impressive data rate. We checked the speed with online tools and found differing results, but mostly in the range of 10 to 400 kB/s. This was totally enough to load some less demanding websites, send out emails and even stream a video on youtube in low quality for a while. |
|||
[[File:Speedtest1.png]] |
|||
[[File:Speedtest2.png]] |
|||
== Methods to prevent dns tunneling == |
== Methods to prevent dns tunneling == |
||
=== Network architecture === |
|||
(todo) |
|||
The first method to prevent dns tunneling would be to block dns requests, so that the client that is not logged in yet can not resolve iodined dns request. It's up to the system administrator to design the rules so that this is the case. With some kind of DNS spoofing, the DNS resolver could only answer with the IP of the login screen / captive portal and not even send out DNS requests to resolve them to other DNS servers. Problems with this approach are listed below. |
|||
=== Tunneling Detection === |
|||
Tunneling of IP traffic over DNS results in unusual DNS traffic that can be spotted. |
|||
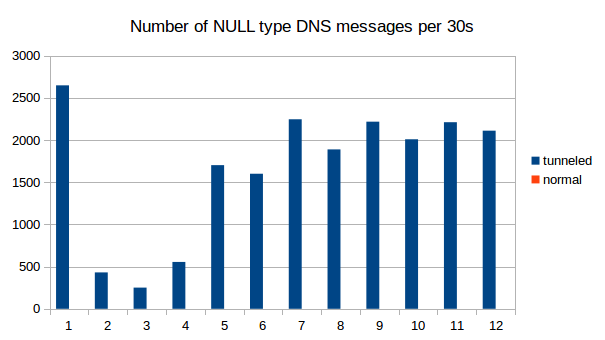
Implementations tend to use DNS types that can have a lot of bytes per packet, e.g. the experimental "NULL" type. We see those only when we use iodine, in regular DNS traffic this type does not appear at all. |
|||
[[File:Iodine-null.png]] |
|||
Naturally, tunneld IP traffic causes a lot more DNS packets to be sent than normal use of the protocol. Also, because as much data as possible is crammed into every single packet, the packets get longer. |
|||
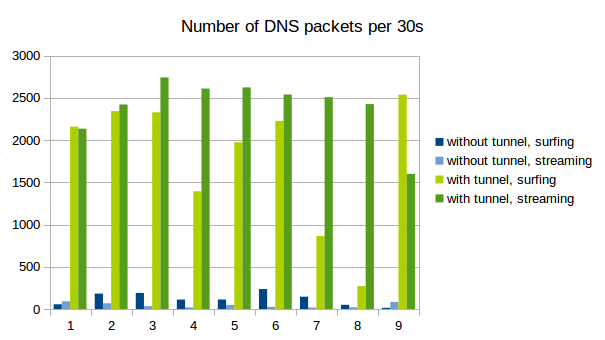
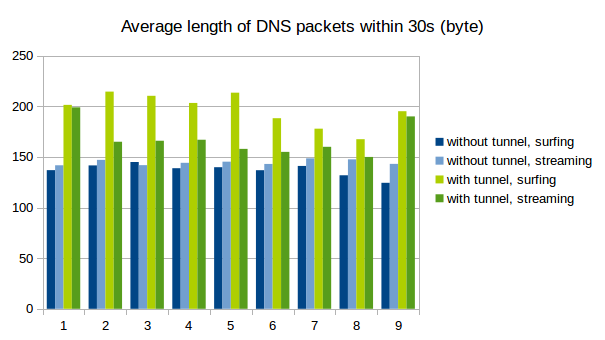
See the following graphs for a comparison between normal DNS load (blue) and DNS metrics while using iodine for tunneling (green). We captured 9 times 30s of traffic and counted the number of DNS packets and the average length. As is clearly visible, the packets tend to get longer and there are decidedly more of them when tunneling is used. |
|||
[[File:Ipoverdns1.png]] |
|||
[[File:Ipoverdns2.png]] |
|||
Another method for detecting DNS tunneling is to analyze the fully qualified domain names (FQNs) that are resolved. Usually, domain names have somewhat meaningfull names like yourshop24.com or mywebsite.net. The fully qualified domain names that are resolved for the tunneling are very long and very arbitrary, containing a combination of many letters and numbers. We recorded the resolved FQNs, the following examples should illustrate the point. |
|||
Example for FQNs with tunneling: |
|||
<code> |
|||
0abbt82M-J2hbM->M-nYM-VAdM-?BM-KM->M-nWwM-bM-RcxbM->M-X5M-RM-mfM-dZkM-DaUM-UM-^TVXM->qGaM-VmgwM-faM->gdki5.a.tunnel.mydomain.com. |
|||
0ebbu82M-J2hbM->M-nYM-VAdM-?BM-UM->M-nWwM-fM-RM-LxbM->M-X5M-RM-mfM-d9ZJx6M-}M-dM-QM-byaiqaSgM-AMnM-^WydtM-we.M-ZG.tunnel.mydomain.com. |
|||
0ibbv82M-J2hbM->M-nYM-VAdM-CBM-?M->M-nWwM-fM-R2xbM->M-X5M-RM-mfM-d9ZJx6M-}M-dM-QM-byaiqaSgM-AMnM-^Wydule.M-ZG.tunnel.mydomain.com. |
|||
0mbbw82M-J2hbM->M-nYM-VAdM-CBM-WM->M-nWwM-fM-RM-dxbM->M-X5M-RM-mfM-d9ZJx6M-}M-dM-QM-bzaiqaSgM-AMfM-^WyduNe.M-ZG.tunnel.mydomain.com. |
|||
0qbbx82M-J2hbM->M-nYM-VAdM-EBM-YM->M-nWwM-mrM-VUdbM-rM-qPM-\lM-LM-dM-SmaM-BIM-]8M-lWM->qGaM-VmgM-FM-fM-_M->M-^dM-Jnf.Ca.tunnel.mydomain.com. |
|||
0ubby82M->tM->dpM-}aabacuaaAXM-uKabagM-@MHGaaeM-jM-VM-[M-uM-Yjyd7zCjM-\HM-ILM-_M-YGcahM-}FM-Ea.aaqiGvM-}M-}M-`BM-EM-BM-_M-ZM-PM-oAM-`M-DM-v.tunnel.mydomain.com.</code> |
|||
Examples for normal FQNs: |
|||
<code> |
|||
img.washingtonpost.com. |
|||
d1pz6dax0t5mop.cloudfront.net. |
|||
ads.twitter.com. |
|||
s0.2mdn.net. |
|||
safebrowsing.google.com. |
|||
www.google.com. |
|||
</code> |
|||
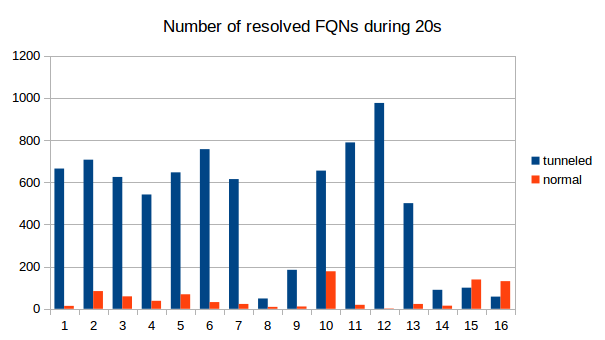
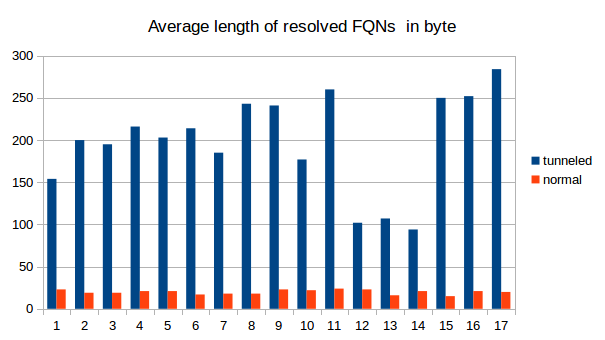
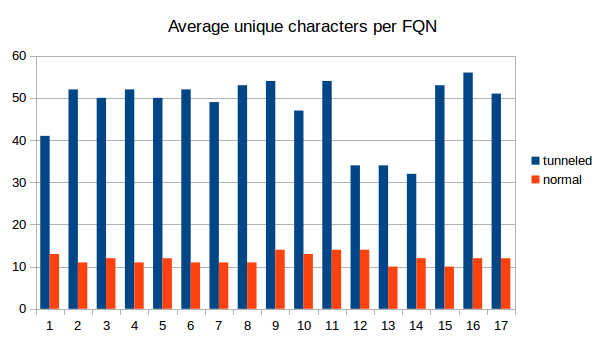
We counted the number of resolved FQNs per 30s, the average number of unique characters in the FQNs and also the length of the FQNs. The differences between tunneling and "innocent" DNS traffic are obvious. It is therefore definitely possible to use some kind of analyzing software to detect DNS tunneling as we did with a simple python script. |
|||
[[File:Iodine-resolved.png]] |
|||
[[File:Iodine-length.png]] |
|||
[[File:Iodine-unique.png]] |
|||
== Problems with Captive Portals == |
== Problems with Captive Portals == |
||
(todo) |
|||
Redirecting the user to the captive portal is basically a '''man in the middle''' attack. They use a HTTP protocol vulnerability to redirect users to their pages. Technically, they were never intended. There is no standard that describes their implementation. |
|||
Of course, it doesn't work with https websites because this kind of man in the middle attacks is prevented there. And https websites with strict transport security are increasingly common. If the user tries to open a https website, they are not redirected to the portal, but instead they get an https error. Already, users often have the problem that many large websites such as Google, Facebook or Twitter can only be reached via HTTPS. Thanks to HSTS, it is ensured that these pages can not be called any more unencrypted. Captive portals won't work when those large and popular websites are requested, and when the ceritificate error message is displayed, it might encourage the bad practise of just clicking through the message and ignoring it. |
|||
There is a workgroup dedicated to figure out solutions for captive portals: https://datatracker.ietf.org/wg/capport/charter/ |
|||
It is not clear how other applications that are not using a webbrowser are supposed to work with a captive portal. E.g. when the user first starts an Email program the service might not work without any indication of what should be done. According to wikipedia, "Platforms that have Wi-Fi and a TCP/IP stack but do not have a web browser that supports HTTPS cannot use many captive portals. Such platforms include the Nintendo DS running a game that uses Nintendo Wi-Fi Connection." |
|||
Forged DNS answers meddle with DNSSEC and can cause errors. They also don't work well if the user has it's own DNS servers configured. Some captive portals force the user to maintain an open browser window all the time, or log in again after a while. |
|||
Not only does DNS tunneling allow for bypassing a captive portal, spoofing of your own MAC address can do the same trick. |
|||
Some software tries to detect captive portals to handle them correctly, but that can also lead to problems and errors, as there is no standard. (example: https://forum.piratebox.cc/read.php?9,8879) |
|||
In general, we are not very fond of the general principle of captive portals. It would be better if a standard was developed to handle this. |
|||
Latest revision as of 13:54, 12 October 2017
Introduction
Firewalls for public wifi such as universities, airports, train stations, coffee shops or hotels often have restricting rules that prevent IP traffic before the user has logged in to the network, requiring a password, some payment or both before allowing access to the internet. But in many cases, DNS traffic to the local nameserver is not blocked. By setting up an authoritative nameserver for one's own subdomain, one can send DNS queries that will be transmitted to this outside DNS server, and therefore transmit data. It is possible to tunnel IP traffic encoded in DNS messages and therefore circumvent the restrictions of the network.
How it works
A large part of the Wlan solutions in use is initially an open, unencrypted WLAN, which in most cases is named after the provider or the location or the hotel name. If the attacker, which at this point still acts as a normal customer, now works its network card to this WLAN and sends a DHCP request, it receives from the access point a local LAN-IP address. However, it can not receive and send packets, since a firewall on the access point drops all outward packets. (In detail, this means that the access point does not reject the connection by sending RST packets, but completely ignores the connection. For Iptables, this is equivalent to the "DROP" statement.) There is an exception to this categorical rejection these are connections on port 80 (HTTP). All HTTP requests are intercepted by the access point via a transparent HTTP proxy and the requests are transferred to a web page of the Wlan provider. The normal customer notices this by entering the browser, entering an arbitrary domain, and instead of the expected website, the web page of the provider appears, usually with a login option and instructions for payment.
But the client can still communicate with the local DNS server. DNS, the service that resolves domain names into IP addresses, is integrated into the access point for most of the wisans. And for all tested wlans, it also resolves names for non-authentic clients, so you can already send DNS queries before paying or logging in. And since the DNS server needs to communicate with other DNS servers out there, a communication channel is created that can be used for tunneling.
The attacker just needs to set up their own domain (say, "mydomain.com") with their own authoritative nameserver that resolves queries for "anysubdomain.mydomain.com". Now, when the DNS resolver of the restricted network gets a request for those subdomains, it sends the request to the authoritative nameserver. Encoded in this request, more specifically, in the subdomain, is the IP packet that goes out. The autoritative nameserver can access the internet himself, acting as a proxy, get the answer and encode it in a DNS NULL or TXT or any other large DNS record type, and send it back to the DNS resolver which will hand the answer to the client. Now the client has sucessfully communicated with the outside world. To conclude, a user needs both a server and a client that communicate through DNS messages under his control, the client being e.g. his laptop in the coffee shop and the server being online somewhere with regular internet access.
This principle is implemented in software such as iodine (http://code.kryo.se/iodine/), which runs on Linux, Mac OS X, FreeBSD, NetBSD, OpenBSD and Windows. You need nothing more than iodine and your own webserver to start tunneling IP over DNS.
Anleitung
DNS Server Setup
Setting up Iodine requires control over a real domain, and a server that is online and can act as iodine server. It has to run with a public IP that will function as nameserver for your domain managed by iodine. For your domain, e.g. "mydomain.com", you need to be able to register NS and A records. Several free domain providers offer this service.
Assume you have a domain called “mydomain.com” and it’s IP is “1.2.3.4”. You have to register a subdomain, e.g. “tunnel.mydomain.com”. Also, you need another subdomain “ns.mydomain.com” for your nameserver. For the tunnel subdomain, Iodine on your own server (1.2.3.4) will pretend to be the authoritative nameserver.
So you need to create an A record for the sub-domain (tunnel.mydomain.com) that point to IP of the private server.
dns IN A 1.2.3.4
And you need a NS recod that makes the dns sub-domain the authoritative name server for the tunnel sub domain.
tunnel IN NS dns.mydomain.com.
The result could look like this:
Iodine Server Setup
install and start iodine
To run iodine on your server, simply install the programm and run the server variation (mind the name: iodined)
$ sudo apt install iodine
$ sudo iodined -f 10.0.0.1 -P 123456 tunnel.mydomain.com
-f: run in foreground
10.0.0.1: the server IP in the virtuel connection / tunnel
-P: use a password ("123456" is here the example)
tunnel.mydomain.com: your tunnel subdomain
Test server
You can test your server setup by putting in the IP here: http://code.kryo.se/iodine/check-it/
Configuring NAT and IP masquerading
To forward your traffic to the internet and make your server do NAT, you have to set this up.
Enable packet forwarding:
echo 1 > /proc/sys/net/ipv4/ip_forward
Make the setting persistent:
echo "net.ipv4.ip_forward=1" > /etc/sysctl.d/60-ipv4-forward.conf
Enable NAT by adding this to your IPTABLES:
iptables -t nat -A POSTROUTING -o eth0 -j MASQUERADE
iptables -t filter -A FORWARD -i eth0 -o dns0 -m state --state RELATED,ESTABLISHED -j ACCEPT
iptables -t filter -A FORWARD -i dns0 -o eth0 -j ACCEPT
Make it persistent, e.g. like this:
iptables-save > /etc/iptables.rules
Iodine Client Setup
install and start iodine
It's important that client and server use the same iodine version. You install iodine on your client computer just as easily as on the server and start it with similar parameters. At the end, it should print "Connection setup complete, transmitting data."
$ sudo apt install iodine
$ sudo iodine -f -P 123456 tunnel.mydomain.com
Test tunnel
Now it's time to test the tunnel. Run this on your client to see if you can reach the server through the tunnel.
$ ping 10.0.0.1
Set up routes to go through the tunnel
Finally, the routes have to be set so that per default packets send through the dns tunnel, as they are "inner" packets in our tunneling. Only data going directly to the DNS resolver of the local, restricted network has to go directly there and not again in the tunnel, because those are the "outer" packets that have to be transmitted to the DNS resolver to transmitted to the outside world. To set up this, we delete the default route, add a new default route and add a route to the DNS resolver. We need to find out our standard gateway and our DNS resolver.
Find out dns server:
$ nmcli dev show | grep DNS
(This is our DNS server IP).
Find out gateway:
$ netstat -rn|egrep "^0.0.0.0"
(in the most left column, you see the destination, in the column right to that, you see the gateway. Pick the one that isn't 0.0.0.0. This is our gateway IP.)
Find out your tunnel interface: ifconfig -> look for something like dns0 that wasn’t there before
Now modify the routes:
$ route del default
$ route add default dns0
And if dns server and gateway don’t have the the same IP adress anyway:
route add -host [DNS server IP] gw [gateway IP]
Put a ssh tunnel through the dns tunnel for encryption
Iodine doesn't encrypt its data per default. To do that, you need to put a ssh tunnel through the dns tunnel.
$ ssh -D 5000 -N root@10.0.0.1
$ curl --socks5-hostname 127.0.0.1:5000 http://httpbin.org/ip
$ google-chrome --proxy-server="socks5://127.0.0.1:5000" http://httpbin.org/ip
Deactivating Iodine
Stop iodine client on client and server (just by pressing ctrl+c)
Set routes back to ‘normal’
$ route del default
$ route add default [gateway ip]
...or just restart your networking manually by using the network manager or restart the device entirely.
Trying it out
We tried out the principle and it worked fine. We actually did manage to circumvent the login portals of eduroam and two different Vodafone hotspots (located at S Adlershof and S Köpenick) as well as one Vodafone homespot. Here is some proof:
Speed
Of course, tunneling IP over DNS does not allow for a very impressive data rate. We checked the speed with online tools and found differing results, but mostly in the range of 10 to 400 kB/s. This was totally enough to load some less demanding websites, send out emails and even stream a video on youtube in low quality for a while.
Methods to prevent dns tunneling
Network architecture
The first method to prevent dns tunneling would be to block dns requests, so that the client that is not logged in yet can not resolve iodined dns request. It's up to the system administrator to design the rules so that this is the case. With some kind of DNS spoofing, the DNS resolver could only answer with the IP of the login screen / captive portal and not even send out DNS requests to resolve them to other DNS servers. Problems with this approach are listed below.
Tunneling Detection
Tunneling of IP traffic over DNS results in unusual DNS traffic that can be spotted. Implementations tend to use DNS types that can have a lot of bytes per packet, e.g. the experimental "NULL" type. We see those only when we use iodine, in regular DNS traffic this type does not appear at all.
Naturally, tunneld IP traffic causes a lot more DNS packets to be sent than normal use of the protocol. Also, because as much data as possible is crammed into every single packet, the packets get longer. See the following graphs for a comparison between normal DNS load (blue) and DNS metrics while using iodine for tunneling (green). We captured 9 times 30s of traffic and counted the number of DNS packets and the average length. As is clearly visible, the packets tend to get longer and there are decidedly more of them when tunneling is used.
Another method for detecting DNS tunneling is to analyze the fully qualified domain names (FQNs) that are resolved. Usually, domain names have somewhat meaningfull names like yourshop24.com or mywebsite.net. The fully qualified domain names that are resolved for the tunneling are very long and very arbitrary, containing a combination of many letters and numbers. We recorded the resolved FQNs, the following examples should illustrate the point.
Example for FQNs with tunneling:
0abbt82M-J2hbM->M-nYM-VAdM-?BM-KM->M-nWwM-bM-RcxbM->M-X5M-RM-mfM-dZkM-DaUM-UM-^TVXM->qGaM-VmgwM-faM->gdki5.a.tunnel.mydomain.com.
0ebbu82M-J2hbM->M-nYM-VAdM-?BM-UM->M-nWwM-fM-RM-LxbM->M-X5M-RM-mfM-d9ZJx6M-}M-dM-QM-byaiqaSgM-AMnM-^WydtM-we.M-ZG.tunnel.mydomain.com.
0ibbv82M-J2hbM->M-nYM-VAdM-CBM-?M->M-nWwM-fM-R2xbM->M-X5M-RM-mfM-d9ZJx6M-}M-dM-QM-byaiqaSgM-AMnM-^Wydule.M-ZG.tunnel.mydomain.com.
0mbbw82M-J2hbM->M-nYM-VAdM-CBM-WM->M-nWwM-fM-RM-dxbM->M-X5M-RM-mfM-d9ZJx6M-}M-dM-QM-bzaiqaSgM-AMfM-^WyduNe.M-ZG.tunnel.mydomain.com.
0qbbx82M-J2hbM->M-nYM-VAdM-EBM-YM->M-nWwM-mrM-VUdbM-rM-qPM-\lM-LM-dM-SmaM-BIM-]8M-lWM->qGaM-VmgM-FM-fM-_M->M-^dM-Jnf.Ca.tunnel.mydomain.com.
0ubby82M->tM->dpM-}aabacuaaAXM-uKabagM-@MHGaaeM-jM-VM-[M-uM-Yjyd7zCjM-\HM-ILM-_M-YGcahM-}FM-Ea.aaqiGvM-}M-}M-`BM-EM-BM-_M-ZM-PM-oAM-`M-DM-v.tunnel.mydomain.com.
Examples for normal FQNs:
img.washingtonpost.com.
d1pz6dax0t5mop.cloudfront.net.
ads.twitter.com.
s0.2mdn.net.
safebrowsing.google.com.
www.google.com.
We counted the number of resolved FQNs per 30s, the average number of unique characters in the FQNs and also the length of the FQNs. The differences between tunneling and "innocent" DNS traffic are obvious. It is therefore definitely possible to use some kind of analyzing software to detect DNS tunneling as we did with a simple python script.
Problems with Captive Portals
Redirecting the user to the captive portal is basically a man in the middle attack. They use a HTTP protocol vulnerability to redirect users to their pages. Technically, they were never intended. There is no standard that describes their implementation. Of course, it doesn't work with https websites because this kind of man in the middle attacks is prevented there. And https websites with strict transport security are increasingly common. If the user tries to open a https website, they are not redirected to the portal, but instead they get an https error. Already, users often have the problem that many large websites such as Google, Facebook or Twitter can only be reached via HTTPS. Thanks to HSTS, it is ensured that these pages can not be called any more unencrypted. Captive portals won't work when those large and popular websites are requested, and when the ceritificate error message is displayed, it might encourage the bad practise of just clicking through the message and ignoring it.
There is a workgroup dedicated to figure out solutions for captive portals: https://datatracker.ietf.org/wg/capport/charter/
It is not clear how other applications that are not using a webbrowser are supposed to work with a captive portal. E.g. when the user first starts an Email program the service might not work without any indication of what should be done. According to wikipedia, "Platforms that have Wi-Fi and a TCP/IP stack but do not have a web browser that supports HTTPS cannot use many captive portals. Such platforms include the Nintendo DS running a game that uses Nintendo Wi-Fi Connection."
Forged DNS answers meddle with DNSSEC and can cause errors. They also don't work well if the user has it's own DNS servers configured. Some captive portals force the user to maintain an open browser window all the time, or log in again after a while.
Not only does DNS tunneling allow for bypassing a captive portal, spoofing of your own MAC address can do the same trick.
Some software tries to detect captive portals to handle them correctly, but that can also lead to problems and errors, as there is no standard. (example: https://forum.piratebox.cc/read.php?9,8879)
In general, we are not very fond of the general principle of captive portals. It would be better if a standard was developed to handle this.
