Vmware-Tools and time synchronization: Difference between revisions
No edit summary |
mNo edit summary |
||
| (18 intermediate revisions by 2 users not shown) | |||
| Line 5: | Line 5: | ||
Installation: |
Installation: |
||
# Install Virtual Machine (e.g. SuSE 9.3 used here) with <code>pcnet32</code> network module (default). |
# Install Virtual Machine (e.g. SuSE 9.3 used here) with <code>pcnet32</code> network module (default) including the kernel sources. |
||
# Run Yast Online Update < |
# Run Yast Online Update <code>you</code>. This updates the packets + kernel + kernel sources. |
||
# Reboot. |
|||
# Install the Vmware-Tools. We use the <pre>dc:/pub/software/RPM/VMwareTools-5.5.1-19175.i386.rpm</pre> which compiles better with 2.6 kernals then the variant distributed with vmware-gsx-server.<pre>rpm -i VMwareTools-5.5.1-19175.i386.rpm</pre>. |
|||
# Now we have to configure the kernel sources: <pre><nowiki> |
|||
cd /usr/src/linux |
|||
make cloneconfig |
|||
make prepare</nowiki></pre> |
|||
# Now we can successfully run <pre>/usr/bin/vmware-config-tools.pl</pre> and follow the instructions. |
|||
# Run <code> vmware-toolbox </code> and check button [[Image:screen1.gif|Options->Time synchronization ...]]. |
|||
# Unfortunatly the guest OS gives timerevents with maximum 1000Hz, what is to slow fror the Linux-SMP-2.6 default kernel. [http://www.vmware.com/support/kb/enduser/std_adp.php?p_faqid=1420 See] Therfore we have to add the kernel boot options: '''<code>clock=pit noapic nolapic nosmp</code>'''<pre><nowiki> |
|||
vi /boot/grub/menu.lst |
|||
# Modified by YaST2. Last modification on Tue Feb 21 12:52:40 UTC 2006 |
|||
color white/blue black/light-gray |
|||
default 0 |
|||
timeout 8 |
|||
gfxmenu (hd0,0)/boot/message |
|||
###Don't change this comment - YaST2 identifier: Original name: linux### |
|||
title SUSE LINUX 9.3 |
|||
kernel (hd0,0)/boot/vmlinuz ...showopts clock=pit noapic nolapic nosmp |
|||
initrd (hd0,0)/boot/initrd |
|||
###Don't change this comment - YaST2 identifier: Original name: floppy### |
|||
title Floppy |
|||
root (fd0) |
|||
chainloader +1 |
|||
###Don't change this comment - YaST2 identifier: Original name: failsafe### |
|||
title Failsafe -- SUSE LINUX 9.3 |
|||
kernel (hd0,0)/boot/vmlinuz ............... 3 |
|||
initrd (hd0,0)/boot/initrd |
|||
</nowiki></pre> |
|||
# Shutdown the VM and configure the network to use <code>vmxnet</code> module instead of <code>pcnet32</code> [[Image:screen2.png]]. |
|||
# Check if in the Vmwares *.vmx file the entry <pre>tools.syncTime = "TRUE"</pre> is correctly set. |
|||
# Power on the VM and choose the right driver for eth0 using yast (it should be named eth? because even <code>/etc/init.d/vmware-tools</code> has to find it) Example:<pre><nowiki> |
|||
brn-suse093-1:~ # cat /etc/sysconfig/hardware/hwcfg-bus-pci-0000:00:11.0 |
|||
MODULE='vmxnet' |
|||
MODULE_OPTIONS='' |
|||
STARTMODE='auto' |
|||
brn-suse093-1:~ # cat /etc/sysconfig/network/ifcfg-eth0 |
|||
BOOTPROTO='dhcp' |
|||
MTU='' |
|||
NAME='VMWare VMware High-Speed Virtual NIC [vmxnet]' |
|||
REMOTE_IPADDR='' |
|||
STARTMODE='auto' |
|||
UNIQUE='7EWs.eUHVfjJn0H8' |
|||
USERCONTROL='no' |
|||
_nm_name='bus-pci-0000:00:11.0' |
|||
</nowiki></pre> |
|||
# Shut down the machine, power off the VM from the GSX-Console and start the VM new. |
|||
Hopefully after a reboot all services start correctly and the time is more accurate. If not please add details to this description! |
|||
'''If a kernel-update is installed the steps 3, 5 and 6 have to be repeated!''' |
|||
Latest revision as of 09:23, 3 March 2006
There are several reasons for installing Vmware Tools in the guest-OS:
- Better network performance by using vmxnet module
- May be better Virtual-disk speed because
/etc/init.d/vmware-toolssets uphdparms. - Time synchronization hetween host & guest OS.
Installation:
- Install Virtual Machine (e.g. SuSE 9.3 used here) with
pcnet32network module (default) including the kernel sources. - Run Yast Online Update
you. This updates the packets + kernel + kernel sources. - Reboot.
- Install the Vmware-Tools. We use the
dc:/pub/software/RPM/VMwareTools-5.5.1-19175.i386.rpm
which compiles better with 2.6 kernals then the variant distributed with vmware-gsx-server.rpm -i VMwareTools-5.5.1-19175.i386.rpm
. - Now we have to configure the kernel sources:
cd /usr/src/linux make cloneconfig make prepare
- Now we can successfully run
/usr/bin/vmware-config-tools.pl
and follow the instructions. - Run
vmware-toolboxand check button .
. - Unfortunatly the guest OS gives timerevents with maximum 1000Hz, what is to slow fror the Linux-SMP-2.6 default kernel. See Therfore we have to add the kernel boot options:
clock=pit noapic nolapic nosmp

vi /boot/grub/menu.lst # Modified by YaST2. Last modification on Tue Feb 21 12:52:40 UTC 2006 color white/blue black/light-gray default 0 timeout 8 gfxmenu (hd0,0)/boot/message ###Don't change this comment - YaST2 identifier: Original name: linux### title SUSE LINUX 9.3 kernel (hd0,0)/boot/vmlinuz ...showopts clock=pit noapic nolapic nosmp initrd (hd0,0)/boot/initrd ###Don't change this comment - YaST2 identifier: Original name: floppy### title Floppy root (fd0) chainloader +1 ###Don't change this comment - YaST2 identifier: Original name: failsafe### title Failsafe -- SUSE LINUX 9.3 kernel (hd0,0)/boot/vmlinuz ............... 3 initrd (hd0,0)/boot/initrd
- Shutdown the VM and configure the network to use
vmxnetmodule instead ofpcnet32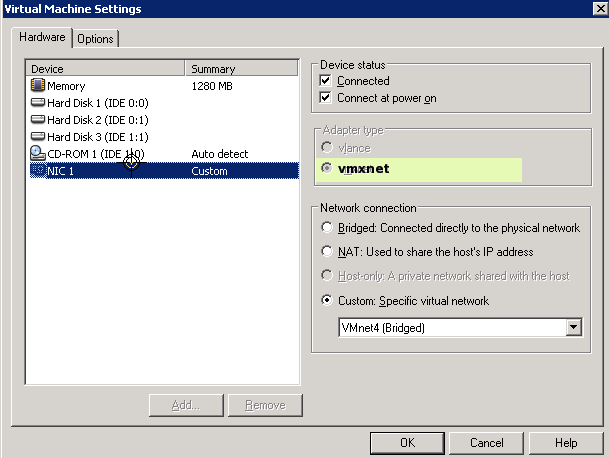 .
. - Check if in the Vmwares *.vmx file the entry
tools.syncTime = "TRUE"
is correctly set. - Power on the VM and choose the right driver for eth0 using yast (it should be named eth? because even
/etc/init.d/vmware-toolshas to find it) Example:

brn-suse093-1:~ # cat /etc/sysconfig/hardware/hwcfg-bus-pci-0000:00:11.0 MODULE='vmxnet' MODULE_OPTIONS='' STARTMODE='auto' brn-suse093-1:~ # cat /etc/sysconfig/network/ifcfg-eth0 BOOTPROTO='dhcp' MTU='' NAME='VMWare VMware High-Speed Virtual NIC [vmxnet]' REMOTE_IPADDR='' STARTMODE='auto' UNIQUE='7EWs.eUHVfjJn0H8' USERCONTROL='no' _nm_name='bus-pci-0000:00:11.0'
- Shut down the machine, power off the VM from the GSX-Console and start the VM new.
Hopefully after a reboot all services start correctly and the time is more accurate. If not please add details to this description!
If a kernel-update is installed the steps 3, 5 and 6 have to be repeated!